Zoom
What is it?
Zoom provides cloud video conferencing and simple online meetings. Instructors can now use Zoom Web Conferencing tool within Canvas to provide a virtual classroom experience, record lectures, or host virtual office hours. Users can seamlessly create Zoom meetings, record, and share via Kaltura's Media Gallery inside Canvas.
Features
- High-quality HD video and audio
- Call-in to meeting’s audio feed using phone
- Easy-to-use tools for collaborating online with others, including sharing and co-annotation tools, breakout rooms, polling, and white-boarding
- Allows for high-quality recordings of meetings and downloading of those recordings as MP4 files
- A full-featured app for iOS and Android
How to Access
Downloads
Users can download the latest version of Zoom for the computer and/or mobile device by clicking the Download button below and selecting the desired download from the Zoom website.
Signing into Zoom Account
Canvas
Instructors can access Zoom within their Canvas courses by clicking the Zoom tab in the course navigation. Meetings should only be scheduled here if the desired attendees are the students of that course. See Zoom for Teachers Guide for more information.
Web Sign-in
Users can access and sign into their UAB Zoom account at uab.zoom.us opens a new website in a web browser.
Zoom App Sign-in
Users can sign in to their UAB Zoom account on the Zoom app (mobile or desktop) by choosing 'Sign in with SSO', typing in UAB as the domain, and providing their BlazerID and Password. See Using the Zoom App Guide for more information.
Note
Instructors must have an account with UAB in order to use the Zoom tab in Canvas. If you already have a free Zoom account (limited to 40 minute meetings) or an account with UA system and desire to use the Zoom tab in Canvas, follow these instructions to switch to new account. Need help with your account? fill out the academic tech support form opens a new website.
Licensed Accounts (Instructors/Staff)
- Up to 300 participants
- Unlimited Meeting Duration
- Unlimited amount of meetings
- Record to the cloud or local machine
- Link recordings to Canvas via Kaltura
- Customize Personal Meeting ID/Link URL
Basic Accounts (Students)
- Up to 100 participants
- Limited to 40 minute meetings (When three or more participants join)
- Unlimited amount of meetings
- Record to local machine
Students that need to meet longer than 40 minutes can fill out the UA system account request form opens a new website. Students requesting a licensed (pro) account will be required to provide contact information for their supervisor so that their reason can be confirmed. If approved, the provisioned pro account will be returned to back to basic at the end of that academic year (July 31).
FAQ
Account
Faculty, staff, and students can create their UAB Standard (Non-HIPAA) zoom account by navigating to uab.zoom.us opens a new website and clicking the green button that says ‘Sign in' then type in your BlazerID and password. This type of account allows you to use Zoom in Canvas, record to the cloud (faculty/staff), and use Kaltura.
If you need a HIPAA compliant account, you can request your account opens a new website through the form on the UA system website. Please note HIPPA accounts cannot record or be used in Canvas.
Those that plan to use Zoom to meet with patients, discuss Protected Health Information (PHI) or for any other use that would require HIPAA compliance can request a HIPAA compliant account by selecting the HIPAA options on the account request form opens a new website on the UA system IITS website. Please note this type of account cannot record or be used in Canvas.
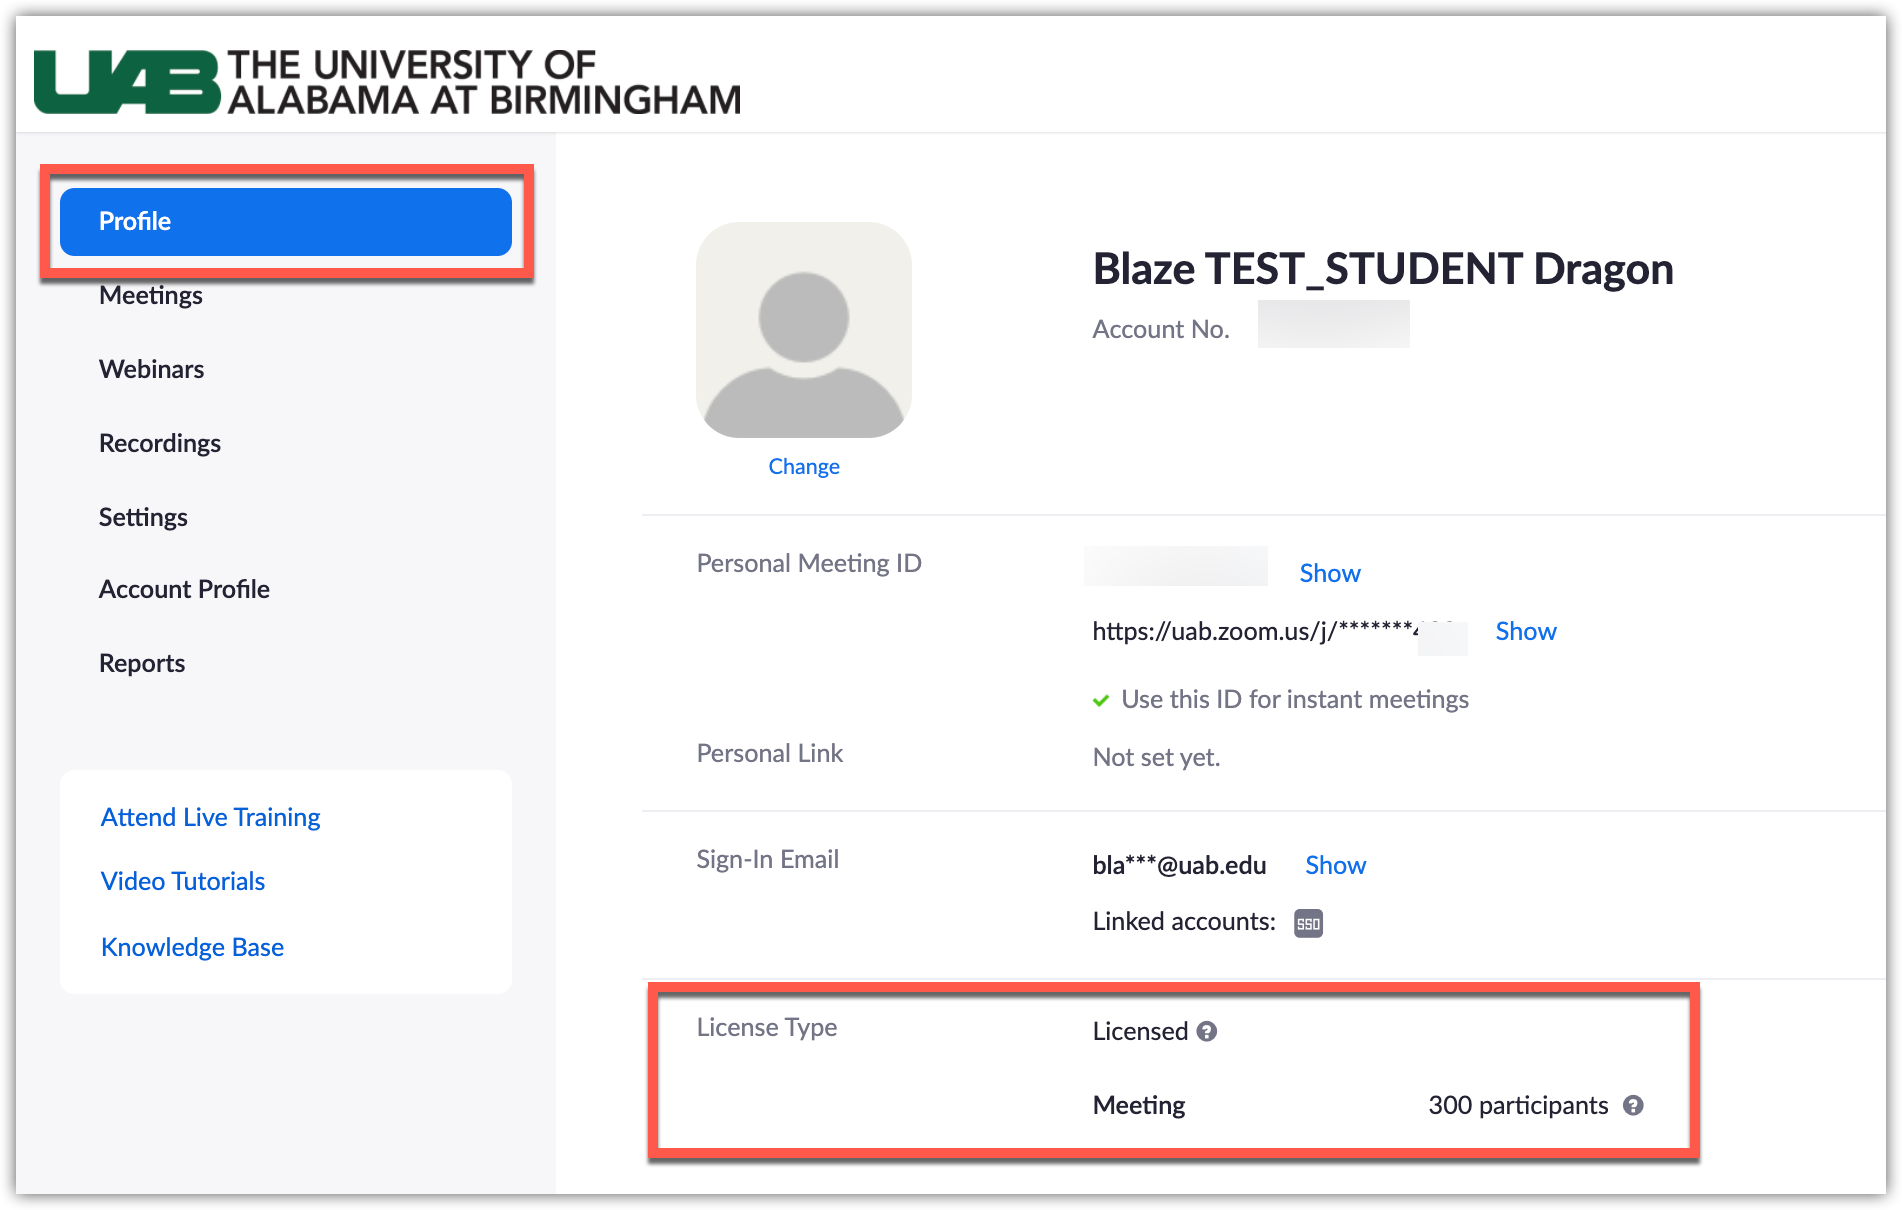
Users either have a Basic or licensed account. Log in to Zoom in a web browser and click Profile at the top left, then look under License Type. Refer the information at the top of this page to see the differences in basic and licensed accounts.
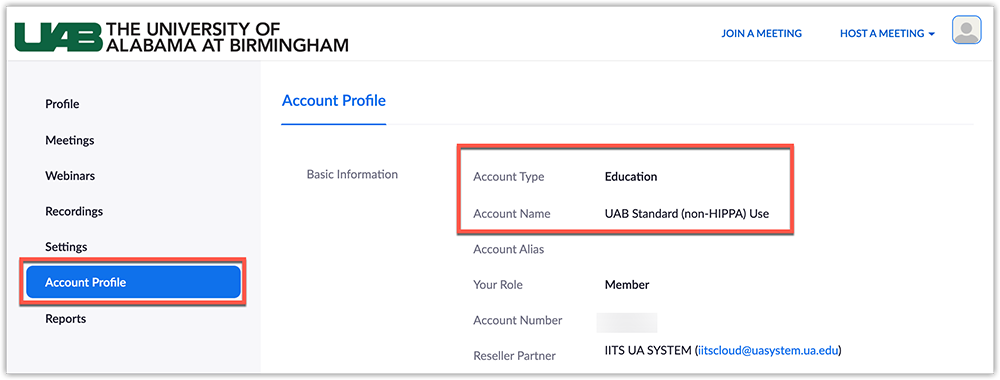
There are two main accounts at UAB: UAB Standard (Non-HIPAA) and UAB HIPAA. Users can log into their Zoom account in a web browser and click Account Profile at the far left, then look and see the type and name of the account they are under.
Students do not need to create a Zoom account in order to attend your meetings that you schedule and host. Students only need to create an account if they want to schedule and host their own meetings (ex. group projects).
There are multiple roles available for a meeting: host, co-host, alternative hosts, and participants. The role that you have in a meeting is designated by the host.
- Host: The user that scheduled the meeting. They have full permissions to manage the meeting. There can only be one host of a meeting.
- Co-hosts: opens a new website Shares most of the controls that hosts have, allowing the co-host to manage the administrative side of the meeting, such as managing attendees. The host must assign a co-host opens a new website during the meeting. Co-hosts cannot start a meeting. If a host needs someone else to start the meeting, they can assign an alternative host.
- Alternative hosts: opens a new website Shares the same controls as co-hosts, but can also start the meeting. Hosts can assign alternative hosts when they schedule a meeting.
See more details on what each role can do opens a new website.
| Feature | Meeting | Webinar |
|---|---|---|
| Description | Zoom meetings are ideal for hosting more interactive sessions where you’ll want to have lots of audience participation or break your session into smaller groups. | Think of webinars like a virtual lecture hall or auditorium. Webinars are ideal for large audiences or events that are open to the public. Typically, webinar attendees do not interact with one another. Though Zoom provides options for you to get more social with your attendees, your average webinar has one or a few people speaking to an audience. |
| Participant roles | ||
| Audio sharing |
|
|
| Video sharing | All participants | Hosts and panelists |
| Screen sharing opens a new website | Yes | Yes |
| Capacity | 100 participants for basic users, 300 participants for licensed | Up to 100-10,000 participants, depending on the paid license |
| Participants list | Visible to all participants | Visible to host and panelist |
| Email reminders | No | If registration is enabled |
| Chat | In-meeting Chat opens a new website | Webinar Chat opens a new website |
| Meeting reactions opens a new website | Yes | No |
| Nonverbal feedback opens a new website | Yes | Only raise hand opens a new website |
| Q&A opens a new website | No | Yes |
| File transfer opens a new website | Yes | No |
| Whiteboard opens a new website | Yes | Yes |
| Annotation opens a new website | Yes | Yes |
| Polling | Polling for meetings opens a new website | Polling for webinars opens a new website |
| Livestream | Facebook opens a new website, YouTube opens a new website, Workplace by Facebook opens a new website, Custom Streaming Service opens a new website | Facebook opens a new website, YouTube opens a new website, Workplace by Facebook opens a new website, Custom Streaming Service opens a new website |
| Registration | Registration for meetings | Registration for webinars |
| Closed captioning | Yes | Yes |
| Recording opens a new website | Yes | Yes |
| Breakout rooms opens a new website | Yes | No |
| Practice session | No | Yes |
| Waiting room | Yes | No |
| Paypal integration opens a new website | No | Yes |
| Require password to join opens a new website | Yes | Yes |
| International dial-in numbers opens a new website | Yes | Yes |
The UA system IITS office offers webinar licenses for purchase. More information on pricing and ordering can be found on the UAB IT opens a new website. Users interested in renting a webinar license for a specific event can contact University Relations opens a new website for up to 5,000 attendees.
Students are given a basic account that is limited to 40 minute meetings. They can schedule as many back to back meetings as desired. If students still need to meet longer than 40 minutes, they can fill out the UA system account request form opens a new website. Students requesting a licensed(pro) account will be required to provide contact information for their supervisor so that their reason can be confirmed. If approved, students accounts will be returned to back to basic accounts after the end of that academic year (July 31st).
Alternatively, students can use an alternative technology such as Microsoft Teams Meetings opens a new website.
Yes. There are official free apps available for iOS and Android opens a new website. The apps support many of Zoom’s features, including hosting meetings and viewing screen sharing. Zoom also includes built-in support for calling in to a meeting over telephone.
Instructions are provided below based on the error code received. If you need additional assistance accessing Zoom inside Canvas, fill out the eLearning Academic Technology Support form opens a new website.
Error Code 1010: User Not Found on this Account
This code appears because you either have a free (basic) zoom account or a UA systems account and must transfer your account to UAB eLearning in order to access Zoom in Canvas.
- Go to uab.zoom.us/saml/login opens a new website.
- Type in your BlazerID and Password if prompted.
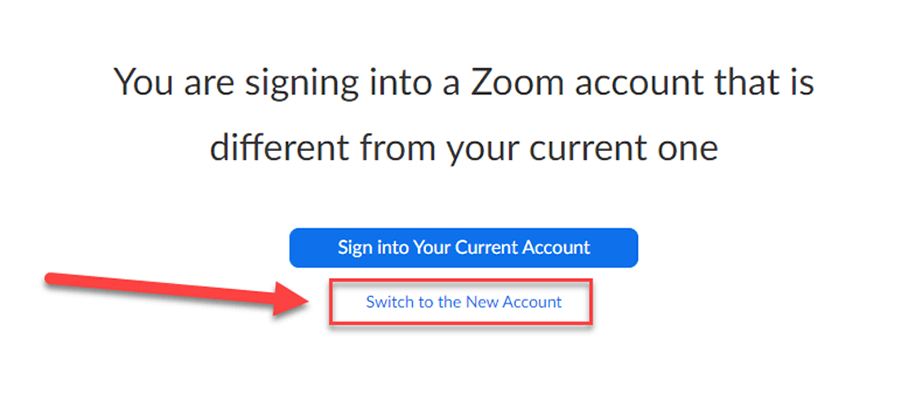
- If asked, click "Switch to the New Account" option.
- Click the "Confirm your email address" button when prompted.
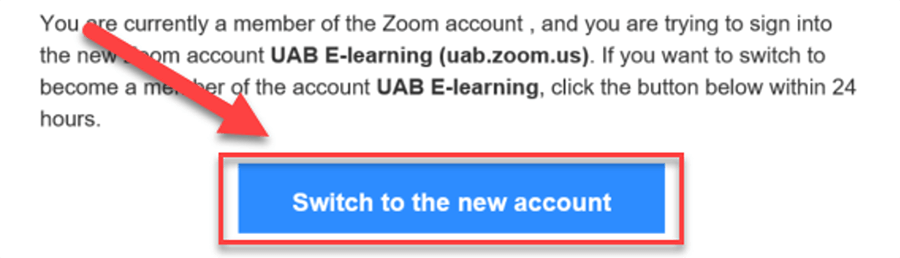
- An email will be sent to your UAB email address from no-reply@ zoom.us. (It may take a few minutes.)
- Click the "Switch to the new account button" found in the email.
- Click the "I Acknowledge and Switch" button, when prompted.
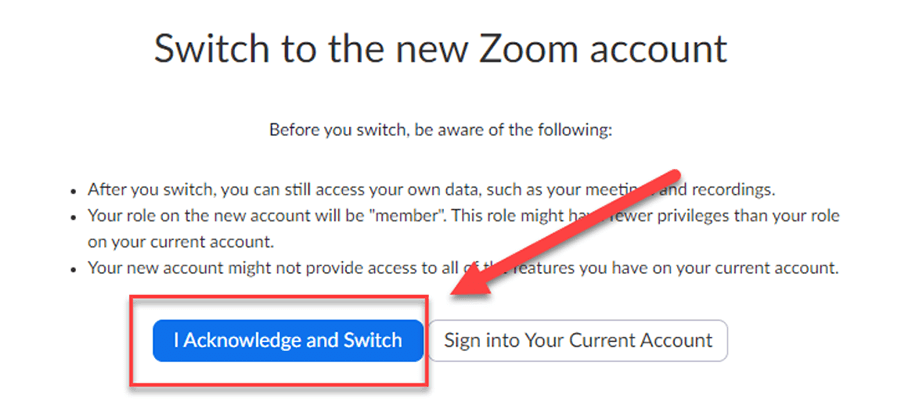
- Your account is now under UAB eLearning and can be used in Canvas. Reattempt to access the Zoom tab in Canvas.
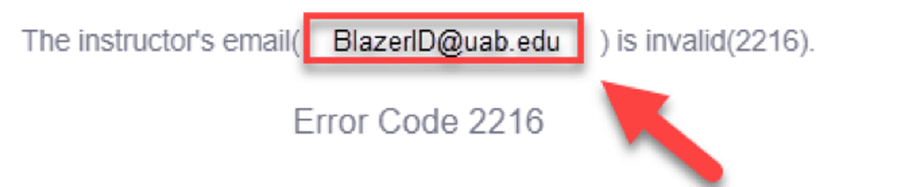
Error Code 2216: The Instructor’s Email is Invalid
This error appears because you do not have a Zoom account or because you do not have your @uab.edu email address as your default email in Canvas.
If the email listed in the error message is your @uab.edu email address then follow the directions below to create a UAB eLearning Zoom account.
- Go to https://uab.zoom.us/saml/login.
- Type in BlazerID and Password if prompted.
- You now have a UAB eLearning Zoom account that can be used with Canvas.
If the email listed in the error code is not your “@uab.edu” email address follow these steps:
- Use the instructions in this Canvas Guide to change the Default email address in Canvas to your @uab.edu address.
- Once that process is complete, attempt to access Zoom inside Canvas again.
If you need additional assistance accessing Zoom inside Canvas, fill out the eLearning Academic Technology Support form.
By default, Zoom will notify you if someone has clicked the link to join your meeting before you have started it. This can be useful, if you have forgotten you had a scheduled meeting or you are using Zoom for office hours.
It is possible that the user clicked on the link early by accident. If you do not know the user, it is possible that they typed in your meeting ID by mistake trying to get into another meeting.
As long as you do not have ‘Enable join before host’ enabled in your meeting, the user that clicks your link does not actually get into your meeting unless you have started the meeting, so there is no security threat. We recommend enabling a password and/or using the waiting room so that you can prevent any undesired users from entering your meeting while in progress.
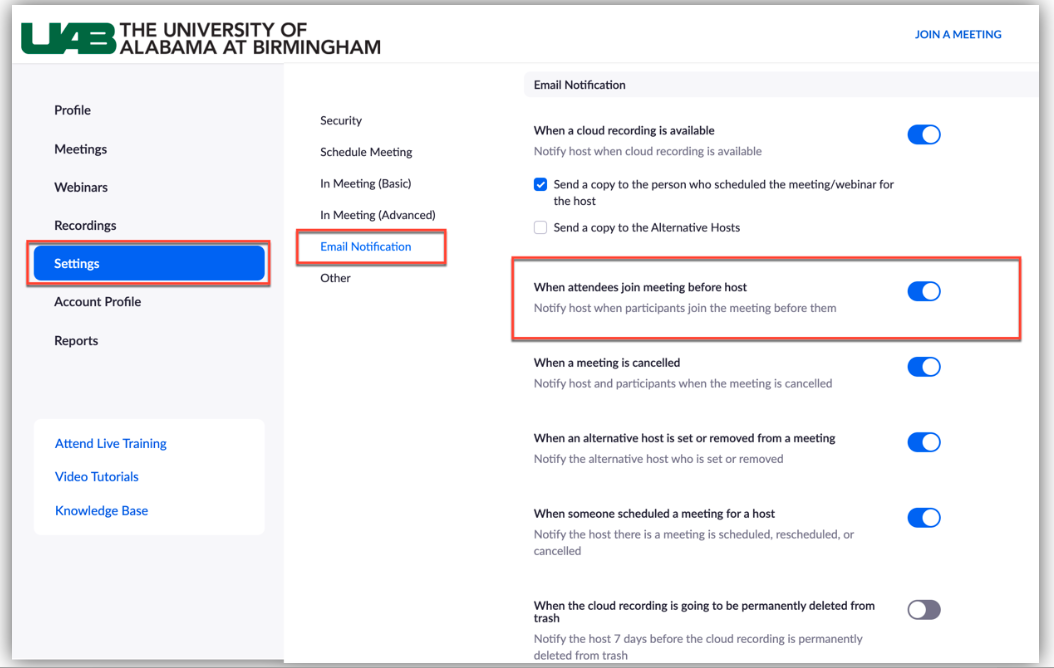
If you would like to turn off this automatic email notification, follow these directions.
- Log in to uab.zoom.us opens a new website.
- Click Settings, then click Email Notification.
- Click the toggle to turn off notification for “When attendees join meeting before host”
Scheduling Meetings
You can schedule a Zoom meeting through various methods:
- Zoom tab in Canvas: If you are scheduling a meeting for your students to attend. The best method is to schedule the meeting within Canvas using the Zoom tab in your course. The meeting will be available to your students automatically and does not require you to send any invitations out. Use our Instructor Guide to Canvas to learn more.
- Zoom website (uab.zoom.us opens a new website): Meetings can be scheduled from any web-enabled device by going to uab.zoom.us, clicking meetings on the left hand side, and then clicking Schedule a Meeting. When your meeting is saved, you will be presented several methods of inviting users to that meeting including calendar invitations, a join link, or a full invitation.
- Zoom App: Meetings can be scheduled in the Zoom application on your computer or mobile phone. Sign into your UAB eLearning account by clicking SSO, typing in UAB as the domain, and then providing your BlazerID and password. Use our Zoom app guide to learn more.
- Extensions: Meetings can be scheduled using one of the various extensions available for Outlook, Chrome, or FireFox. Download extensions opens a new website.
- Access one of the above methods and click Schedule a Meeting.
- Check Recurring Meeting.
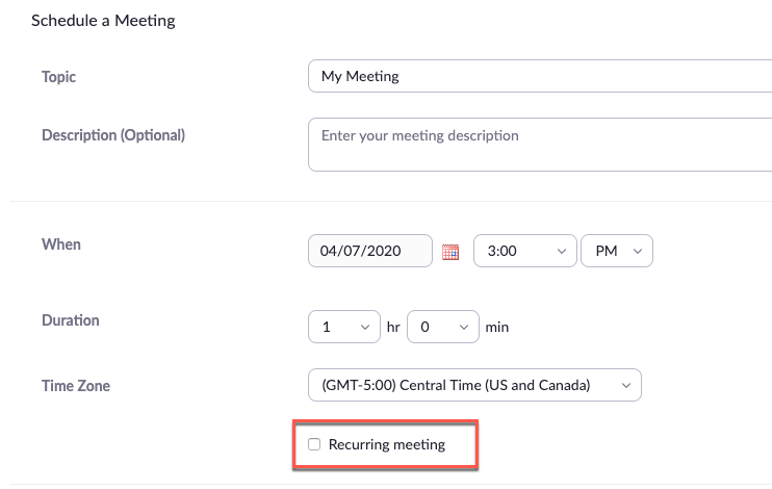
- Edit the recurrence. This includes the number of times the meeting occurs and how often it occurs.
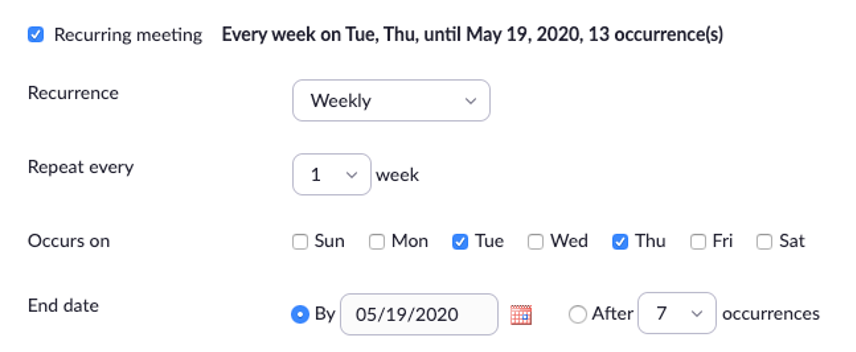
- Note: Recurring meetings can have a maximum of 50 occurrences. If you need more than 50 occurrences, you can use the No Fixed Time option.
- If registration is required and the meeting is recurring, specify one of the following options:
- Attendees register once and can attend any of the occurrences: Registrants can attend all of the occurrences. All dates and times of the meeting will be listed and the registrant will be registered for all occurrences.
- Attendees need to register for each occurrence to attend: Registrants need to register separately for each occurrence to attend. They can only choose one date and time on the registrant page.
- Attendees register once and can choose one or more occurrences to attend: Registrants register once and can choose one or more occurrences to attend. They will need to select which dates and times they would like to attend and they will only be registered for those occurrences. They can choose multiple options.
- Click Save.
- Finish selecting the meeting options and click Schedule.
Visit this Zoom Guide for more information on reoccurring meetings opens a new website.
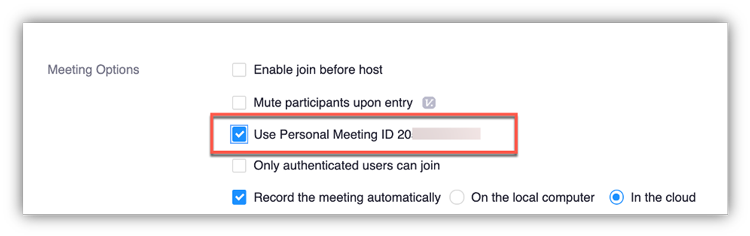
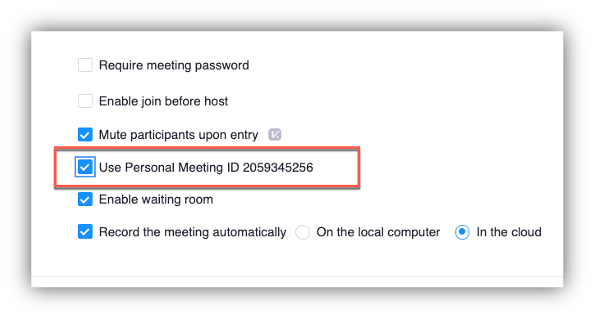
Option 1 - Use Personal Meeting ID in scheduled meetings
You can schedule a Zoom meeting in each shell separately at the same date/time, but check the box for ‘use personal meeting ID’. This will make it so that each course sees the meeting in their Canvas shell through the Zoom tab and there are two separate scheduled meetings, but in the backend they tie to the same meeting so all will be able to join at the same time.
Please Note: This option is not available if you choose to make the meeting reoccurring, so you will need to schedule each desired meeting individually.

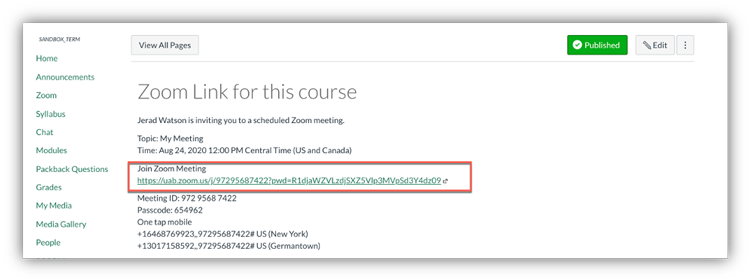
Option 2 - Schedule outside of Canvas and paste the Join information in the Canvas course
You can schedule one meeting outside of Canvas at uab.zoom.us opens a new website set it to reoccurring and then just place the join link in all desired Canvas courses (on a page, syllabus, announcement etc.)
Option 3 - Schedule one of the meetings in one of the Canvas Shells and provide other courses join information
You can schedule the Zoom meeting in one of your Canvas courses and then grab the join link or full invitation from that meeting and place that information in the other Canvas courses (on a page, syllabus, announcement, etc.)
Option 4 – Consider Cross-listing Courses
If you have several Canvas course shells for a course that meets at the same time, one option is to consider cross-listing your Canvas course shells into 1 course shell, especially if each group of students complete the same work but just have different due dates. This brings all the students into one course shell, where you can schedule just one Zoom meeting for all students as well as provide content, assignments, etc. all in one shell. Request your courses be cross-listed opens a new website on our Canvas Request page.
Please Note: Crosslistings should be done before the semester begins and cannot be done after students have made submissions in any of the course shells.
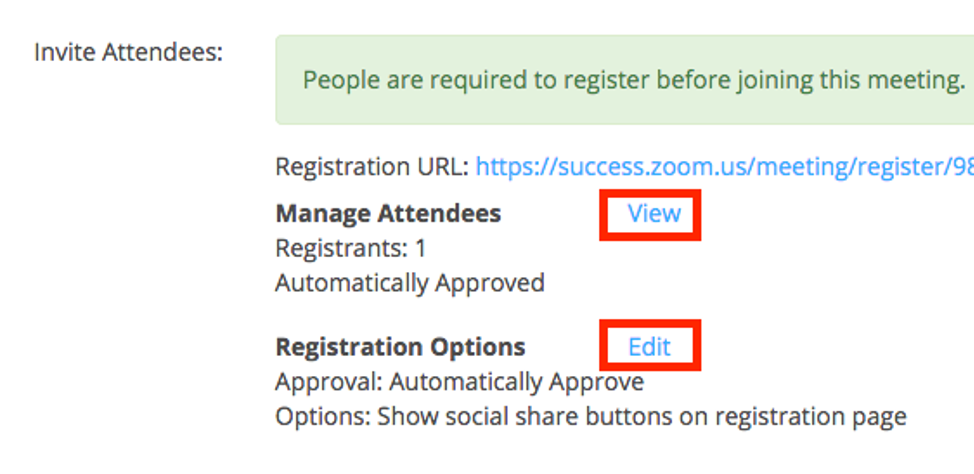
Registration can be used to make a public facing meeting more secure. You can set registration to manual or automatic approval. You can also use registration to collect information before a meeting begins and be able to send event reminders and follow up emails
To require registration:
- Choose a method to access Zoom and Click Schedule a Meeting.
- Click the box beside Registration.
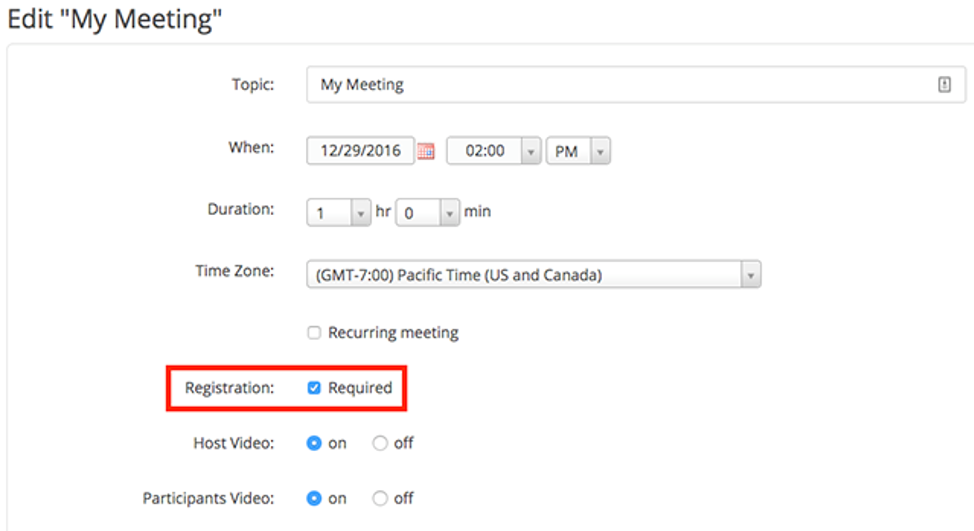
- If you are in Canvas, you will need to save the meeting and login to uab.zoom.us opens a new website in order to access the registration settings. If you are already in uab.zoom.us you can save your meeting and the registration settings will be available at the bottom of the screen.
Visit this Zoom Guide for more information on registration opens a new website.
By default a meeting cannot begin until the host starts the meeting. Adding someone as an alternative host allows this person to start the meeting in the absence of the original host.
Many users confuse co-host opens a new website and alternative host opens a new website. The main use of an alternate host is so that they can start the meeting in the absence of the main host. The main use of co-host is so that someone else can manage participants, etc. Anyone can be a co-host once in the meeting regardless of their account type. Learn more about selecting someone as a co-host opens a new website.
Requirements of Alternative Host
- Both the host and alternative host have to have Pro Licenses (cannot add students as alternative hosts).
- Both the host and alternative host have to be on the same account/sub-account (uab.zoom.us is separate from zoom.us and uasystem.zoom.us).
- Must use uab.edu email, not uabmc.edu.
Related Information
- Users do not need to be added as alternative host in order to share their screen/webcam and present. All attendees automatically have this ability.
- If you want allow the meeting to be started without you, you can edit your scheduled meeting to allow join before host opens a new website. Note: Anyone who click the join link will start the meeting.
Students are given a basic account that is limited to 40 minute meetings by default. If students still need a pro account because they are a TA, they can fill out the UA system account request form opens a new website. Students requesting a licensed(pro) account will be required to provide contact information for their supervisor (instructor) so that their reason can be confirmed. If approved, students accounts will be returned to back to basic accounts after the end of that academic year (July 31st).
There are times when an administrative assistant may need to schedule meetings for another person. There are three options for how to do this, shown below.
Option 1: Scheduling Privileges
Users can give other individuals permissions to schedule meetings for them. This allows a user to schedule a meeting and choose who this meeting is being scheduling for (Me or other user). If you choose to schedule a meeting for another user, it will actually schedule the meeting in their account. This means that person can start the meeting without you being present and any recordings will be in their account, not yours. If you choose to join the meeting you scheduled for another user, you will automatically be a co-host who can help manage participants. See below for how to assign scheduling privileges.
Prerequisites
- You and the person you want to schedule meetings for have to be on the same account (UA system and UAB eLearning are different accounts).
- You and the assigned scheduler must be assigned as Licensed (pro account, not basic).
Set up Instructions
The user that wants to give the permission for someone to schedule for them should follow these instructions:
- Sign in to the Zoom web portal.
- Click Settings.
- Click Other, scroll down, and click the + next to Assign scheduling privilege to.
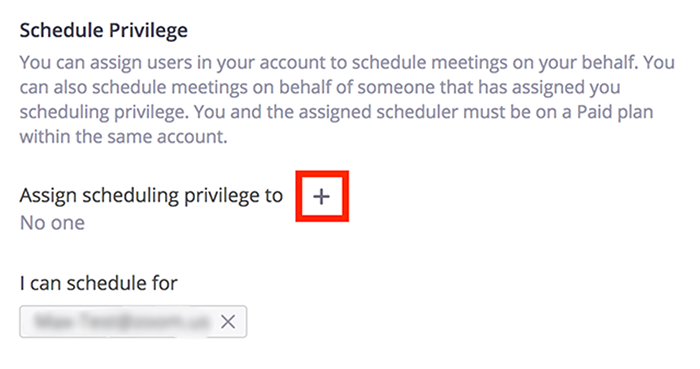
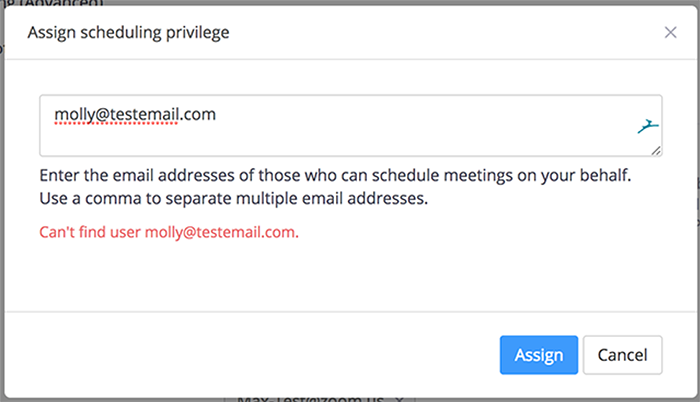
- Enter one or more email addresses in the window, separated with a comma.
- Click Assign.

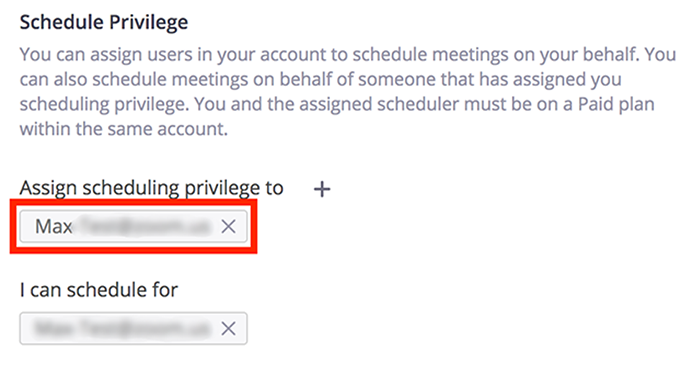
If the user was assigned successfully, they will appear under Assign Scheduling Privilege to. However, they will need to sign out of the Zoom desktop client and sign in again before they will be able to schedule for you there.
If scheduling privilege cannot be assigned because the user is not on your account or is not a Pro user, you will receive an error message.
Once completed, see these instructions for how to schedule meetings for other people opens a new website.
Option 2: Alternative Host
You can also put someone as alternative host for your meeting. This allows them to start the meeting on your behalf, but the meeting is still in your account. This allows the recordings of meetings to remain in your account; however, you are unable to have a separate meeting while these meetings are going on.
See the FAQ question "What is an alternative host and why will it not let me add someone?" above for more information.
Option 3: Enable Join before Host
This allows anyone who has the join link to start the meeting. There are definite limitations on this when using Waiting Room or wanting the meeting to be recorded, but is a quick fix if the meeting is about to happen and you cannot join.
See the FAQ question "What is Join before Host?" above for more information.
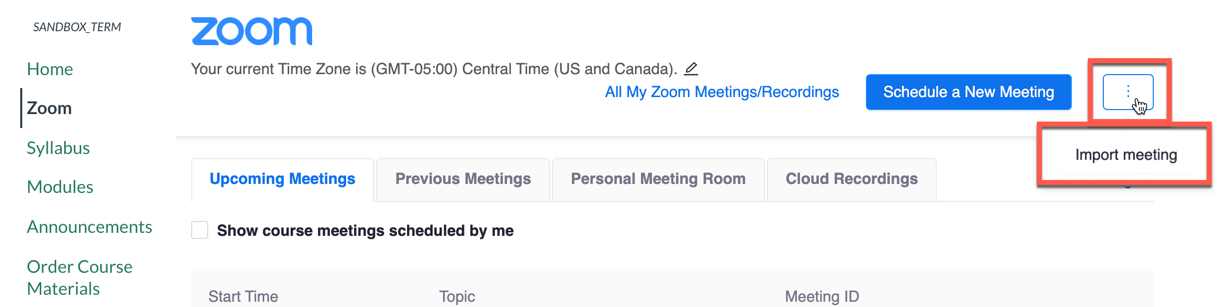
Meetings scheduled outside of Canvas can be imported into a Canvas course. Follow the directions below.
Please note that meetings can only be imported into 1 Canvas course.
- Locate the scheduled Zoom meeting and copy the Meeting ID.
- Go to desired Canvas course and click the Zoom tab in the course navigation.
- Click the 3 dots at the top right and select Import Meeting.
- Paste or type in the meeting ID of the meeting you want to be available to this course.
- Students in this course can then access and join the meeting from Canvas.
Users can schedule a meeting and set it to reoccur at “no set time”. This allows this meeting to be used repeatedly at any time with the join link and other settings staying the same.
- Go to uab.zoom.us opens a new website
- Click Meetings on the left hand side
- Click Schedule a new meeting
- Fill in title and other information
- Check the box for the meeting to reoccur.
- Choose “no fixed time” as the occurrence drop down window.
- Save the meeting.
Teaching (Features)
Instructors are provided an account that allows up to 300 participants.
It is best to schedule your Zoom meeting in the Zoom tab in Canvas. Meetings scheduled in a Canvas course are automatically available for students to join by clicking join in the Zoom tab in Canvas or course calendar/to-do list.
If you scheduled a meeting outside of Canvas, you can either share the meeting link in a Canvas announcement module or import that meeting into Zoom tab in Canvas.
Students do not have to be provided the Zoom join link if you schedule your meeting inside of Canvas, but anyone outside of Canvas will need to be provided the join link or invitation to your Zoom meeting so they can join.
Simply invite external speakers to the meeting by sending them the Zoom invitation/join link .
Co-host are people you allow to have similar features as you, meaning they can manage participants. Note: You do not have to make someone a co-host to share their screen or present. All attendees have this ability by default.
You can make anyone in your meeting a co-host opens a new website once the meeting has begun.
- Students can unmute their microphone opens a new website and ask questions during a meeting
- Students can type their question in the Chat box opens a new website. Items typed in chat are seen by the host and all attendees by default
- Students can respond using non-verbal communication opens a new website (yes, no, thumbs up, thumbs down, hand wave, etc. )
- Students can also annotate on a white board or shared screen opens a new website
Yes, there is a polling feature opens a new website that is turned on by default. It is best to create your polls beforehand. You can create up to 10 sets of 25 polls. Your options are single choice or multiple choice questions. When you present a poll, you can see the results privately and then choose to share the results to all in the meeting. You can also run a report at the end to show what everyone answered.
Hosts and co-hosts can mute/un-mute individuals or all participants, change who attendees can chat to, and choose who can share their screen. Learn more about managing attendees opens a new website.
Breakout rooms opens a new website are a feature that is enabled by default in the toolbar of Zoom. It allows you to break your total attendees into separate Zoom sessions for an amount of time. The groups can be made manually or automatically on the fly. Once you send everyone into a breakout room, the host and co-host can pop in to one breakout room at a time to see how things are going or to assist students.
Note: Breakout rooms are not included in the Zoom cloud recording. Students placed in the breakout room can record the breakout room session locally to their device.
Option 1
Breakout Rooms can be created once in a meeting. You can have Zoom randomly assign students into a desired amount of rooms or you can manually assign which participants are in each room.
Option 2 (advanced)
Zoom also has the ability to pre-assign breakout rooms before a Zoom meeting begins though this feature only exist outside of Canvas. If you choose to use this feature, please follow the instructions below.
- Schedule meeting at uab.zoom.us
- Check the boxes for (both check boxes are required for it to work)
- Only allow authenticated users to join
- Pre-Assign Breakout Rooms
- Upload a CSV of the breakout rooms and who you want to be placed in those rooms (@uab.edu emails) Note: CSV is case sensitive and must use all lowercase for emails
- Share the meeting join links with students by sending an announcement, email, etc. or import the meeting into your Canvas shell using the 3 dots at the top right of the Zoom tab in Canvas and typing the meeting ID in (meetings can only be imported into one Canvas shell).
- Tell your students they will be asked to sign in when joining your meeting (this is the only way it will know who they are and what room to put them in). They will have to sign in using SSO (Single Sign On = BlazerID/Password). Here is a guide on how to sign-in to Zoom opens a new website on phone or computer when joining a meeting.
When your students join, it will pair them with the emails you pre-assigned. When you are ready to send them to their breakout rooms, click ‘Break out rooms’ in the Zoom toolbar and click ‘Open All Rooms’. If you see anyone left over not assigned, you can assign them to a room manually.
Virtual background is a feature that can replace your background behind you when sharing your webcam with a static image or video. Not all computers meet the required technical specifications to use this feature.
To use a virtual background:
Before Meeting
- Open the Zoom application opens a new website on your computer and sign in using SS0 (Single Sign-On, BlazerID)
- Click your profile picture at the top right, then click Settings.
- Select Virtual Background.
- Check I have a green screen if you have a physical green screen set up. You can then click on your video to select the correct color for the green screen.
- Click on an image to select the desired virtual background or add your own image by clicking + and choosing if you want to upload an image or a video.
- If prompted, click Download to download the package for virtual background without a green screen.
During a Meeting
- In a Zoom meeting click the ^ arrow next to Start/Stop Video.
- Click Choose a virtual background.

Notes:
-
- Ensure that you are using a solid background color for best performance.
- After you select an option, that virtual background will display during your meetings.
- To disable Virtual Background, choose the option None.
Below are a few suggestions:
Option 1
Instructors can schedule a Zoom meeting and call it “office hours’ using the Zoom tab in Canvas and allow multiple students to come in and ask questions during that time. You would simple start this meeting, continue working on your computer, and would hear the doorbell when a student enters so that you can attend to their questions.
If you want your office hours to be available to multiple classes at the same time, you can click the checkbox in the meeting options to ‘use personal meeting ID’. This will allow everyone from multiple classes to join into the same meeting. *This option is not available for reoccurring meetings.
Option 2
Instructors can also have students email you or book a time with you in some other format (Microsoft bookings opens a new website, excel sheet sign up, Canvas Calendar appointment groups opens a new website) and have one-on-one meetings with students through Zoom. You can also use your personal meeting room opens a new website for this, but we recommend that you click the “enable waiting room’ option so that if another student tries to join while you are meeting with a student, you can admit them in or message them to let them know you will be with them shortly.
Private chat means a participant of a Zoom meeting can chat privately with another participant without the host knowing. Private chat is now turned off by default within Zoom UAB eLearning Zoom accounts. Right now Hosts are the only ones that can privately chat with a participant. Participants can only chat with everyone in the room or the host. You can re-enable it in your account by going to you Zoom account in a web browser, clicking settings button on the left, and toggling the ‘private chat’ feature. This allows private chat for all future meetings you schedule and host.
Attendance in a Zoom meeting is accessible as a Usage Report. A Zoom Usage Report displays how many and who attended the meeting.
Learn more about pulling Zoom reports opens a new website. Additionally, instructors can also pull reports from Zoom in Canvas opens a new website if the meeting was scheduled there.
Security
Any user that has the join link to your Meeting can join in. Avoid publicly posting your meeting link, especially your personal meeting room link. Other security measures are shown below.
Set a Meeting Password opens a new website
This makes it so that users trying to join by typing a meeting ID in will also have to know the password. Users joining from Canvas or by clicking a join link will not have to know the meeting password. This settings is automatically turned on for all users on the UAB eLearning account.
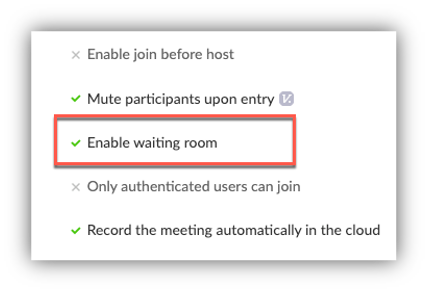
Enable Waiting Room opens a new website
This makes it so that users joining your meeting do not immediately join the room but see a screen letting them know the host will let them in soon. The host of the meeting is notified when someone is in the meeting room and can admit them in or message them privately. This feature is turned on for all meetings by default, but can be unchecked if desired. This option is great to turn on for your personal meeting room.
Lock the Meeting opens a new website
Once a meeting starts, the host can lock the meeting (found in the participants tab). This prevents anyone from joining even if they have the join link and password.
If an unwanted person were to join your meeting or a student were to misbehave in a Zoom session, the host can remove participants opens a new website from a meeting. Note that this user will be unable to join the same meeting.
Recordings
You can start recording once a meeting has started opens a new website or set a meeting to automatically record opens a new website when scheduling the meeting. Finally, users canset all meetings to be recorded opens a new website for their account.
Users have the ability to record to the cloud opens a new website or locally to their machine opens a new website. Recording locally to the computer will produce a mp4 video file while recording to the cloud records it in Zoom’s servers and Kaltura.
Meetings recorded to the cloud are deleted after 30 days from Zoom servers. Zoom meetings are automatically sent to Kaltura (My Media) and are not deleted from Kaltura. Learn how to share Kaltura videos in or out of Canvas.
Yes, the host can assign multiple participants the ability to record opens a new website the meeting locally to their device in addition to him/herself.
Student Specific Questions
Students do not need a Zoom account in order to join Zoom meetings by default. Just click the Join button beside the meeting title in Canvas, or the join link provided by your instructor.
More information can be found in our Student Zoom Guide.
Yes. There are official free apps available for iOS and Android opens a new website. The apps support many of Zoom’s features, including hosting meetings and viewing screen sharing. Zoom also includes built-in support for calling in to a meeting over telephone.
Students can create a Zoom account by clicking the green button that says ‘log into/create Zoom Account’ on the eLearning Zoom page. Students are provisioned a basic account that allows them to schedule and host meetings with up to 100 participants and is limited to 40 minutes in length. Students can schedule an unlimited amount of meetings.
Students are given a basic account that is limited to 40 minute meetings. They can schedule as many back to back meetings as desired. If students still need to meet longer than 40 minutes, fill out the UA system account request form opens a new website. Students requesting a licensed(pro) account will be required to provide contact information for their supervisor so that their reason can be confirmed. If approved, students accounts will be returned to back to basic accounts after the end of that academic year (July 31st).
Alternatively, students can take advantage of other video conferencing tools such as Microsoft Teams that does not have a time limit on meetings. More information on Microsoft Teams is available on the UAB IT website opens a new website.
Guides & Tutorials
-
Basic Zoom Guides
- How to Update Zoom App opens a new website
- Zoom Meeting Guide: Host Controls opens a new website
- Zoom Meeting Guide: Attendee Controls opens a new website
-
Download Resources
- Download Zoom Meeting Housekeeping Video opens a new website Instructors
- Download Zoom Webinar Housekeeping Video opens a new website Instructors
- "Rename Yourself" Powerpoint Slides Instructors
- "How to Join Breakout Room" Powerpoint Slides Instructors
-
Archived Workshops
- Zoom Basics opens a new website
- Zoom Advanced opens a new website