Note for users of screen readers: Letters in parentheses in the instructions below refer to corresponding areas on example images. If you have any questions about these instructions, contact the Office of Learning Technologies for assistance opens a new website.
Edit Timeline:
Users can edit the timeline of the media which includes chapters and slides. More information is below.
- Click the Timeline (A) tab to edit chapters and/or slides for media.
- Current Chapters (B) are shown on the timeline with a bookmark icon. Click this icon to edit that chapter.
- Current Slides (C) are shown on the timeline with a page icon. Click this icon to edit that slide.
- Click the Add Chapter (D) icon to add a new chapter at the current place in the timeline.
- Click the Add Slide (E) icon to add a new slide at the current place in the timeline.

Tip: Use Kaltura Capture to record PowerPoint presentations and the slides will automatically be added as chapters for you.
Edit/Insert Chapters:
Chapters allow users watching the video to navigate through the video by clicking the provided chapter links. Chapter information and tags are also searchable in the media player. Once you have clicked Add Chapter follow the directions below.
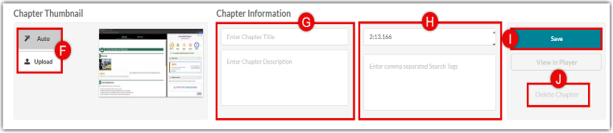
- Choose the chapter Thumbnail (F) by either uploading a file or keeping the auto image from the media.
- Type in the Title and Description (G) of chapter that will display and be searchable in the player.
- Choose the time on the Time and Tags (H). Time will be the start of the chapter and tags will be searchable.
- Click Save (I) to save your changes or Delete (J) to delete the chapter.
Edit/Insert Slides:
Users can record a video of someone presenting and then add slides afterwards. Follow the directions below.
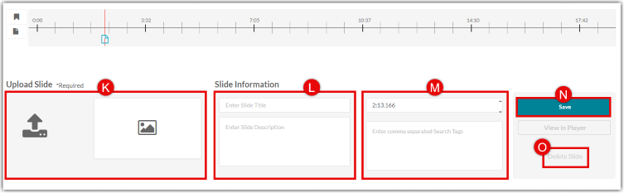
- Click the Upload (K) symbol to choose the individual slide. PPT, PPTX, or PDF is accepted.
- Enter or edit the Title and Description (L) that is searchable.
- Enter or edit the Time and Tags (M). Time is where the slide will be placed and tags are searchable.
- Click Save (N) to save your changes or Delete (O) to delete the slide.